|
<< Click to Display Table of Contents >> Display Tools: Zooming, Rotating and Moving |

  
|
|
<< Click to Display Table of Contents >> Display Tools: Zooming, Rotating and Moving |
|
The Display Tools icons are found on the Viewer Toolbar. With these tools, you can zoom in on an image, rotate an image, and move the image on the screen.
![]()
Moving the Image
There may be times when you need to move the image on the screen to focus in on a specific part of the image. To do this,
1.By default, ProSeek is ready to use the Pan Tool. ![]()
2.Move your cursor over the image to be moved, making sure the Pan Tool hand appears over page display. If not, then click the Pan Tool icon from within the Viewer toolbar.
3.Click and hold your left mouse button and drag the cursor to move the image. You'll notice that the cursor of an open hand will change to a close hand/fist when you move the image around the screen.
Copying Text / Text Clipping Tool
ProSeek lets you highlight a portion of the age and copy text to your clipboard for future use.
1.Click the Text Clipping icon ![]() on the Title Toolbar in the Viewer. When you move your cursor away from the Text Clipping icon, you will see a cross hair cursor
on the Title Toolbar in the Viewer. When you move your cursor away from the Text Clipping icon, you will see a cross hair cursor ![]() rather than the normal hand cursor. This indicates that the copy function is working.
rather than the normal hand cursor. This indicates that the copy function is working.
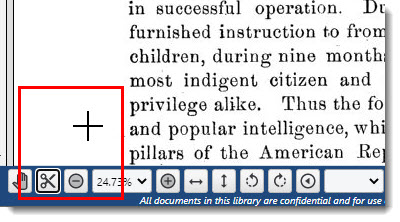
2.Move the cross hair cursor to a corner of the text you wish to copy.
3.Click and drag the cross hair cursor to the end of the text you wish to copy. NOTE: This is the same procedure you would use to copy text in word processing and other programs. The text you select is highlighted in blue.

4.Release the cursor. A pop-up screen will open with the text you selected.
5.Clicking the Copy to Clipboard button captures the text so it can be pasted as text into another document/email, etc.
6.Click the Close button to return to the Viewer.
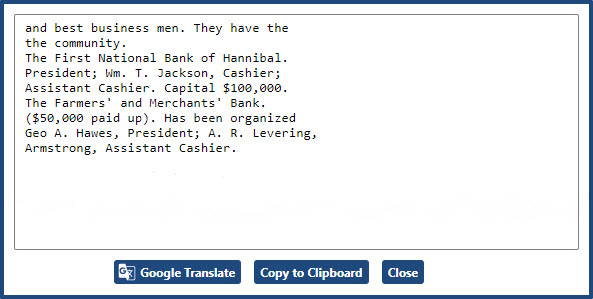
NOTE: Clicking on the ![]() button will transfer the captured text to the Google Translate website for translation.
button will transfer the captured text to the Google Translate website for translation.
Zooming
There are several different ways to zoom in and out of an image.
Zoom Icons ![]()
![]()
To make text and images appear larger, click on the Zoom in icon: ![]() Continue clicking until the image is the size you want.
Continue clicking until the image is the size you want.
To make text and images appear smaller, click on the Zoom out icon: ![]() Continue clicking until the image is the size you want.
Continue clicking until the image is the size you want.
Pan Tool ![]()
Double-click on the image to make text and images appear larger. Continue double-clicking until the image is the size you want.
NOTE: The Pan Tool is the default cursor in the image; you do not necessarily have to click on the icon to use this tool.
Fit to Width or Fit to Height
To resize the image to fit the width of your screen, click on the Fit to Width icon: ![]()
To resize the image to fit the height of your screen, click on the Fit to Height icon: ![]()
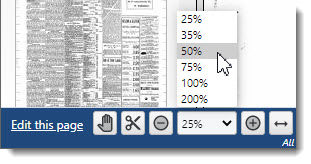
Page Magnification Menu
To Increase or decrease the size of the image by a percentage of the size of the original source material, use the page magnification drop down menu.
1. Click on the arrow to the right of the page magnification size field. This will bring up a range of percentages from which to choose.
2. Click the appropriate percentage.
Rotating
Sometimes the image you are viewing is not in the appropriate position for viewing accurately. To remedy this just
•click on the Rotate Counter Clockwise button ![]() to rotate the image counter-clockwise 90 degrees. Continue clicking the icon until you arrive at the appropriate view.
to rotate the image counter-clockwise 90 degrees. Continue clicking the icon until you arrive at the appropriate view.
•click on the Rotate Clockwise button ![]() to rotate the image clockwise 90 degrees. Continue clicking the icon until you arrive at the appropriate view.
to rotate the image clockwise 90 degrees. Continue clicking the icon until you arrive at the appropriate view.
NOTE: When you use any of the display tools mentioned above, the new zoom level or page view will remain in effect for all pages in the current document unless you change the zoom level or rotate the page back to the its original orientation. When you access a new document, the view is automatically reset.
Browse | Viewer | Search | Map Search | Print | Audio Files | Text Correction | User Annotation
© NMT Corporation - All rights reserved.